안드로이드 UI 테스트 준비하기
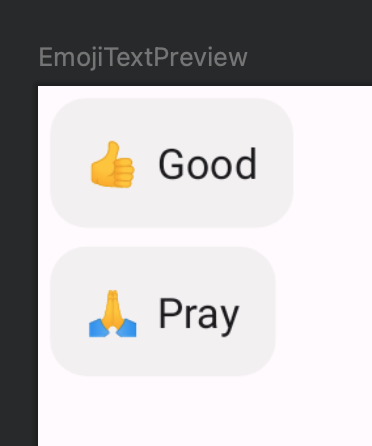
안드로이드 UI 테스트를 위해 다음과 같은 모양의 EmojiTextComposable을 준비하자.
@Composable
fun EmojiText(
    modifier: Modifier = Modifier,
    emoji: String,
    content: String,
    contentDescription: String? = null,
) {
    Card(
        modifier = modifier.semantics {
            this.contentDescription = contentDescription ?: ""
        },
        colors = CardDefaults.cardColors(containerColor = Color.LightGray.copy(alpha = 0.2f)),
        elevation = CardDefaults.cardElevation(defaultElevation = 3.dp),
    ) {
        Row(modifier = Modifier.padding(12.dp), verticalAlignment = Alignment.CenterVertically) {
            Text(text = emoji)
            Spacer(modifier = Modifier.width(6.dp))
            Text(text = content)
        }
    }
}
이 EmojiTextComposable은 이모지와 그에 대한 설명이 들어간 카드로 그림1 과 같은 모양을 가진다.

여기까지 UI 테스트를 위한 준비가 마쳐졌다.
createComposeRule 사용해 UI 테스트 하기
이 EmojiText 컴포저블을 테스트하기 위해 특정한 Activity가 필요하지 않을 것이다. 이런 경우, 우리는 createComposeRule 을 사용해 Jetpack Compose의 일반적인 Activity를 사용해 테스트를 작성할 수 있다. 즉, 우리가 앱에서 만든 특정한 Activity에 테스트를 종속시키고 싶지 않을 때 우리는 createComposeRule을 사용해 테스트를 작성할 수 있다.
createComposeRule을 사용하는 방법은 간단하다. JUnit4에서 지원하는 기능인 @get:Rule 어노테이션을 붙인 변수에 createComposeRule() 로 만들어지는 객체를 할당하면 매 테스트 시마다 Compose 용 테스트 룰을 작성하는 수고를 줄일 수 있다.
class UITestSample {
    @get:Rule
    val composeRule: ComposeContentTestRule = createComposeRule()
    ...
}
createComposeRule 함수를 사용하면, ComposeContentTestRule 객체가 반환돼 composeRule에 할당되며, 이제 이 composeRule 변수를 사용하면, 코루틴에 대한 테스트를 작성할 수 있다. composeRule.setContent 를 통해 테스트를 원하는 Composable을 작성한 후, composeRule.onNodeWithText 함수를 통해 뷰 아이템을 찾고, 해당 뷰 아이템이 제대로 화면에 띄워졌는지 확인하기 위해 assertIsDisplayed 단언을 사용할 수 있다.
class UITestSample {
    @get:Rule
    val composeRule: ComposeContentTestRule = createComposeRule()

    @Test
    fun testEmojiTextProperlyDisplayed() {
        // When
        composeRule.setContent {
            EmojiText(emoji = "👍", content = "good")
        }

        // Then
        composeRule.onNodeWithText("good").assertIsDisplayed()
    }
}
이제 이 테스트를 실행해보자. 그러면 UI 테스트가 제대로 실행돼 앱이 실행되고 테스트가 통과하는 것을 볼 수 있다.

정리
1. 안드로이드의 UI 테스트는 composeRule을 통해 UI 컴포넌트를 띄운 후 해당 UI 컴포넌트가 예상한대로 동작하는지 확인하는 방식으로 동작한다.
2. @get:Rule 어노테이션을 사용하면 매번 createComposeRule을 부르는 코드를 작성할 필요가 없다.

